In the last post I had built up some Makefiles and docker tooling to create nginx based images to serve the mame emulators. So, now it’s time to deploy the images to the kubernetes cluster using ArgoCD.
Github Actions
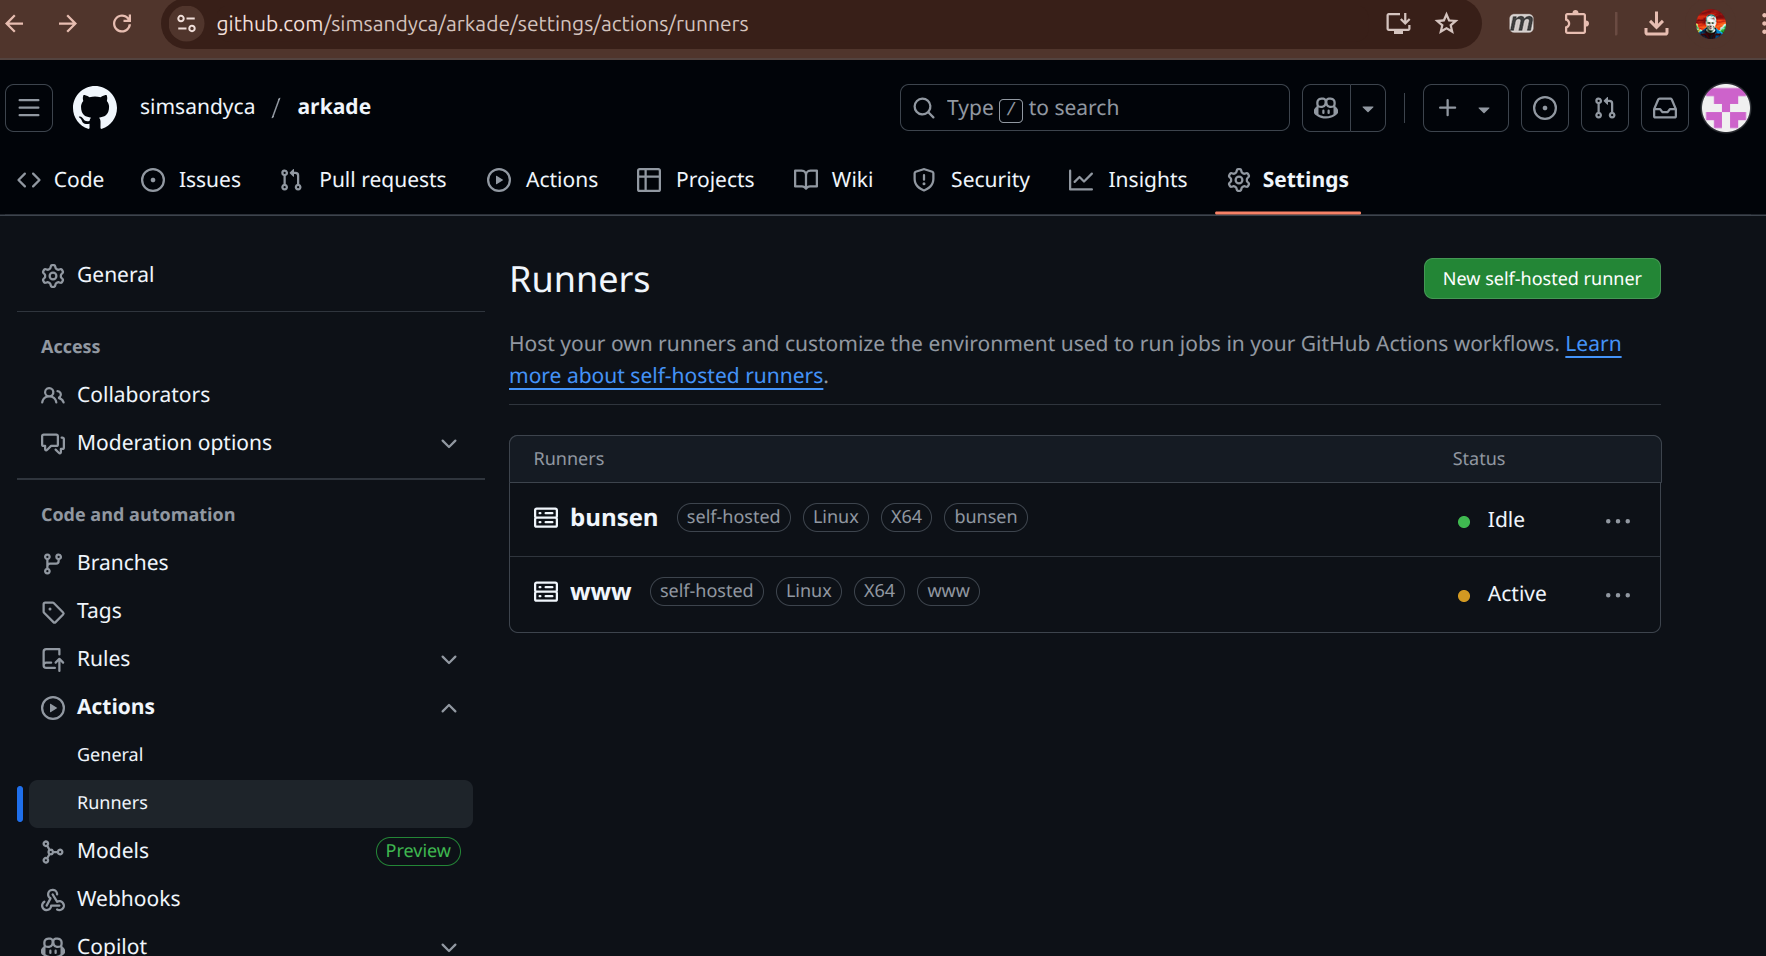
I setup a two self-hosted action runners to use with Github Actions. The action runner on my main server builds the emulators. Then the action runner on the in-cluster thinkpad can run deployments using argocd sync.
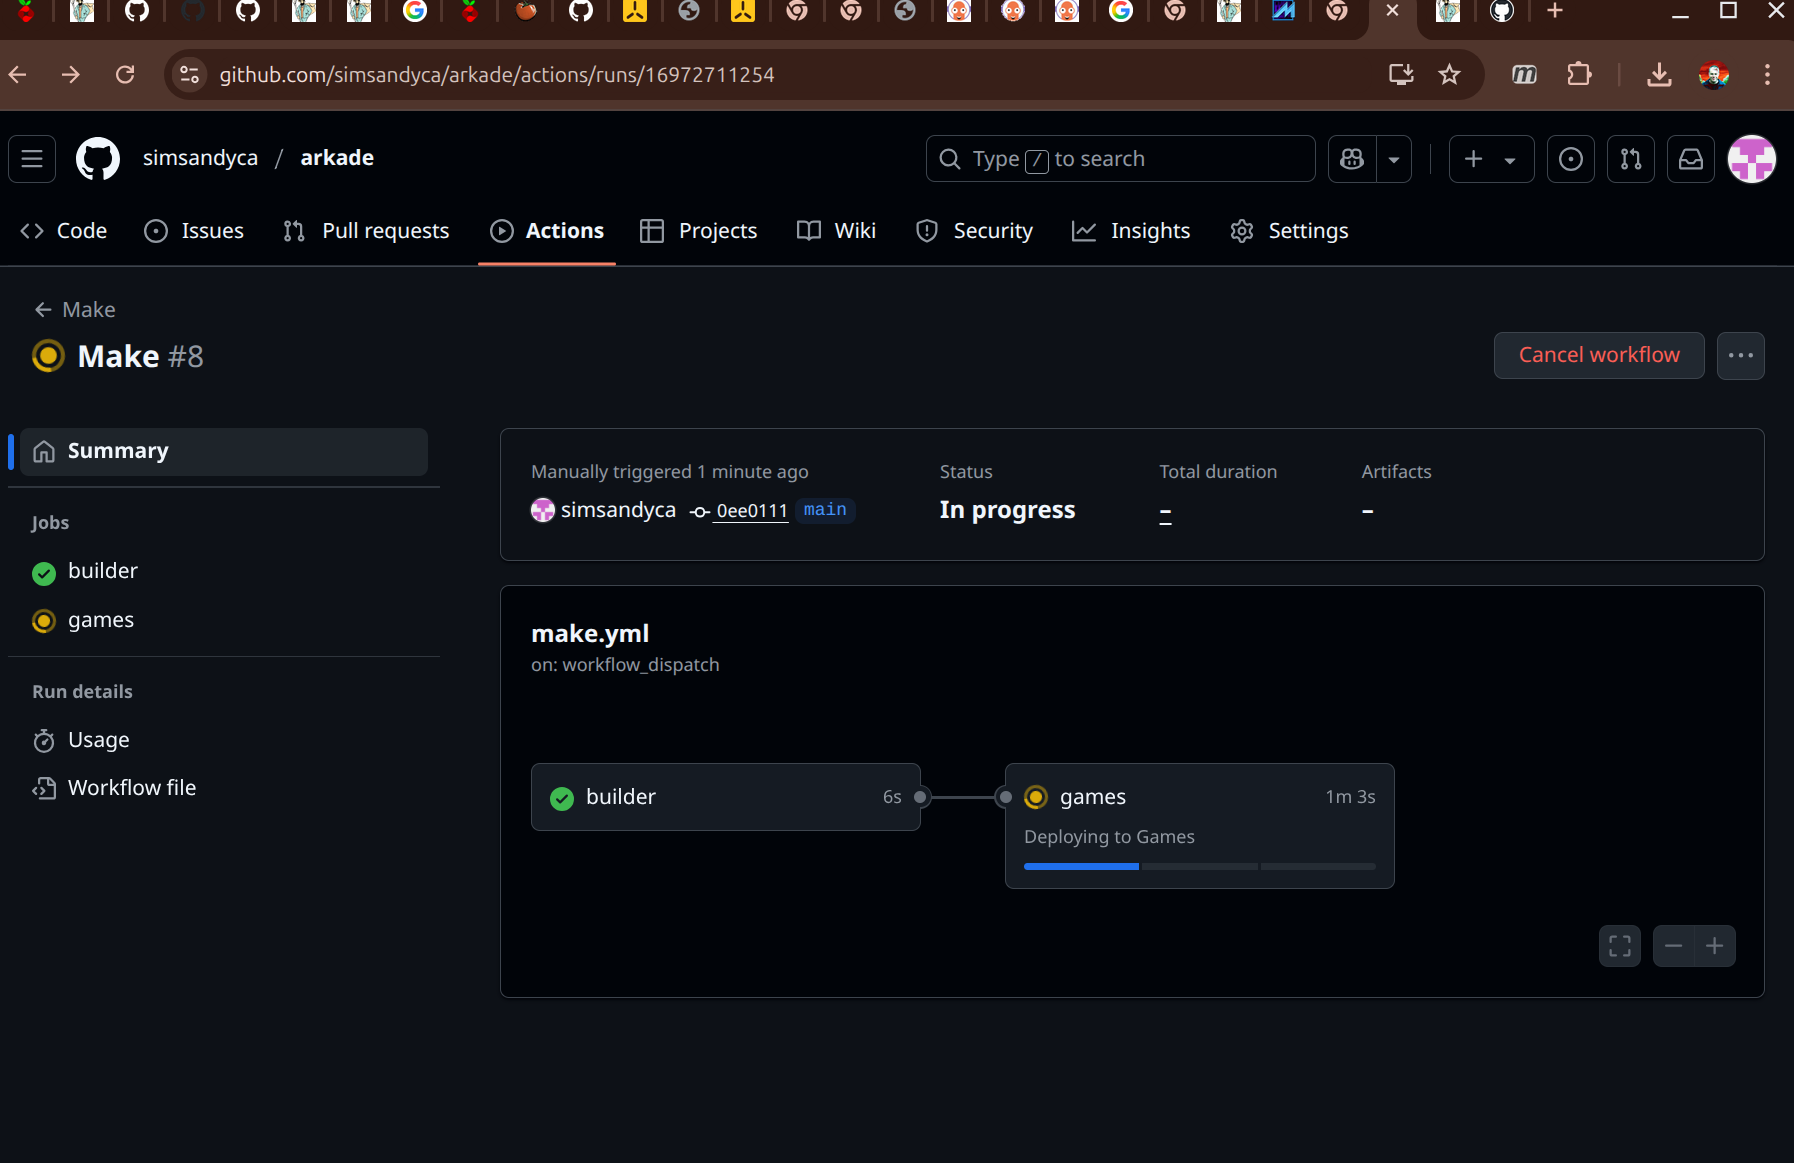
Then I setup a maker workflow and tested out it out.
name: Make
on:
  workflow_dispatch:

jobs:
  builder:
    environment: Games
    runs-on: www
    steps:
      - uses: actions/checkout@v4
      - name: Make the mamebuilder
        run: |
          make mamebuilder
          docker tag mamebuilder docker-registry:5000/mamebuilder
          docker push docker-registry:5000/mamebuilder
  games:
    environment: Games
    needs: [builder]
    runs-on: www
    steps:
      - uses: actions/checkout@v4
      - name: Make the game images
        run: |
          make
          echo done
After triggering the make workflow on github, the build runs and emulator images are pushed to my private docker registry – checking that from inside the cluster’s network shows:
sandy@bunsen:~/arkade/.github/workflows$ curl -X GET http://docker-registry:5000/v2/_catalog
{"repositories":["1943mii","20pacgal","centiped","circus","defender","dkong","gng","invaders","joust","mamebuilder","milliped","pacman","qix","robby","supertnk","tempest","topgunnr","truxton","victory"]}
Helm Chart
Next I worked on a helm chart for the emulators. I created the standard helm chart:
mkdir helm
cd helm
helm create game
On top of the default chart, I added a Traefik IngressRoute next to each deployment and a volume mount for the /var/www/html/roms directory. The final layout is like this:
The Traefik IngressRoute object replaces the usual kubernetes ingress. I added a couple targets in the Makefile that can package the chart and deploy all the emulators:
install: @for game in $(GAMES) ; do \ $(HELM) install $$game game-$(CHART_VER).tgz \ --set image.repository="docker-registry:5000/$$game" \ --set image.tag='latest' \ --set fullnameOverride="$$game" \ --create-namespace \ --namespace games ;\ done
upgrade: @for game in $(GAMES) ; do \ $(HELM) upgrade $$game game-$(CHART_VER).tgz \ --set image.repository="docker-registry:5000/$$game" \ --set image.tag='latest' \ --set fullnameOverride="$$game" \ --namespace games ;\ done
The initial install for all the emulators is make package install. Everything is installed into a namespace called games so it’s relatively to clean up the whole mess with kubect delete ns games. There was one adjustment I had to make in the helm chart…kubernetes enforces RFC 1035 for service names. I was using the game name as the service name, but games like 1943mii don’t conform. So I updated the service definitions in the chart like this: name: svc-{{ include "game.fullname" . }} to get around it.
ArgoCD Setup
ArgoCD is setup in the cluster based on the getting started guide. Ultimately, I made a little script argocd.sh to do the setup on repeat:
That installs ArgoCD into it’s own namespace and sets up an IngressRoute using Traefik. The ConfigMap patch is necessary to avoid redirect loops (Traefik proxies https at the LoadBalancer anyway). Then it goes on and logs in the admin user and updates the password.
Then added a couple more targets to the Makefile
argocd_create:
        $(KUBECTL) create ns games || true
        $(KUBECTL) apply -f roms-pvc.yaml
        @for game in $(GAMES) ; do \
            $(ARGOCD) app create $$game \
                --repo https://github.com/simsandyca/arkade.git \
                --path helm/game \
                --dest-server https://kubernetes.default.svc  \
                --dest-namespace games \
                --helm-set image.repository="docker-registry:5000/$$game" \
                --helm-set image.tag='latest' \
                --helm-set fullnameOverride="$$game" ;\
        done

argocd_sync:
        @for game in $(GAMES) ; do \
            $(ARGOCD) app sync $$game ; \
        done
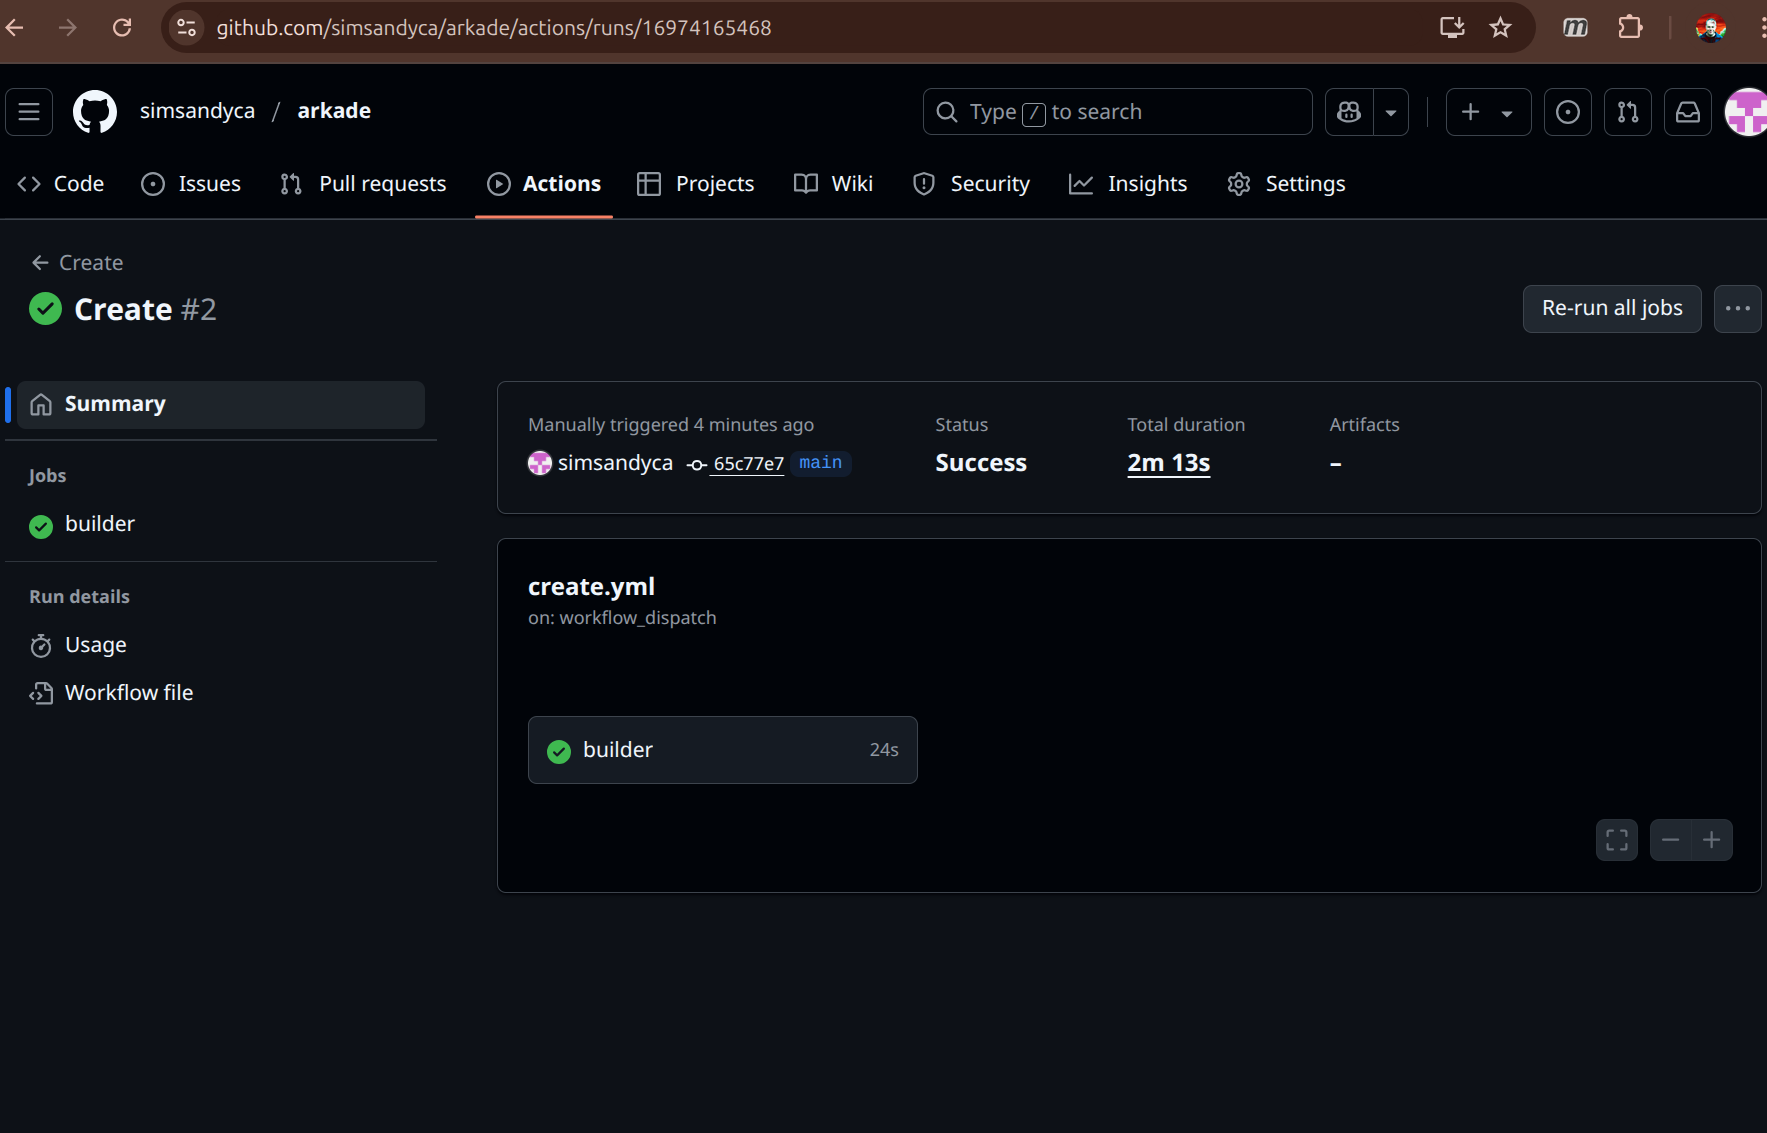
And added a workflow in GitHub actions:
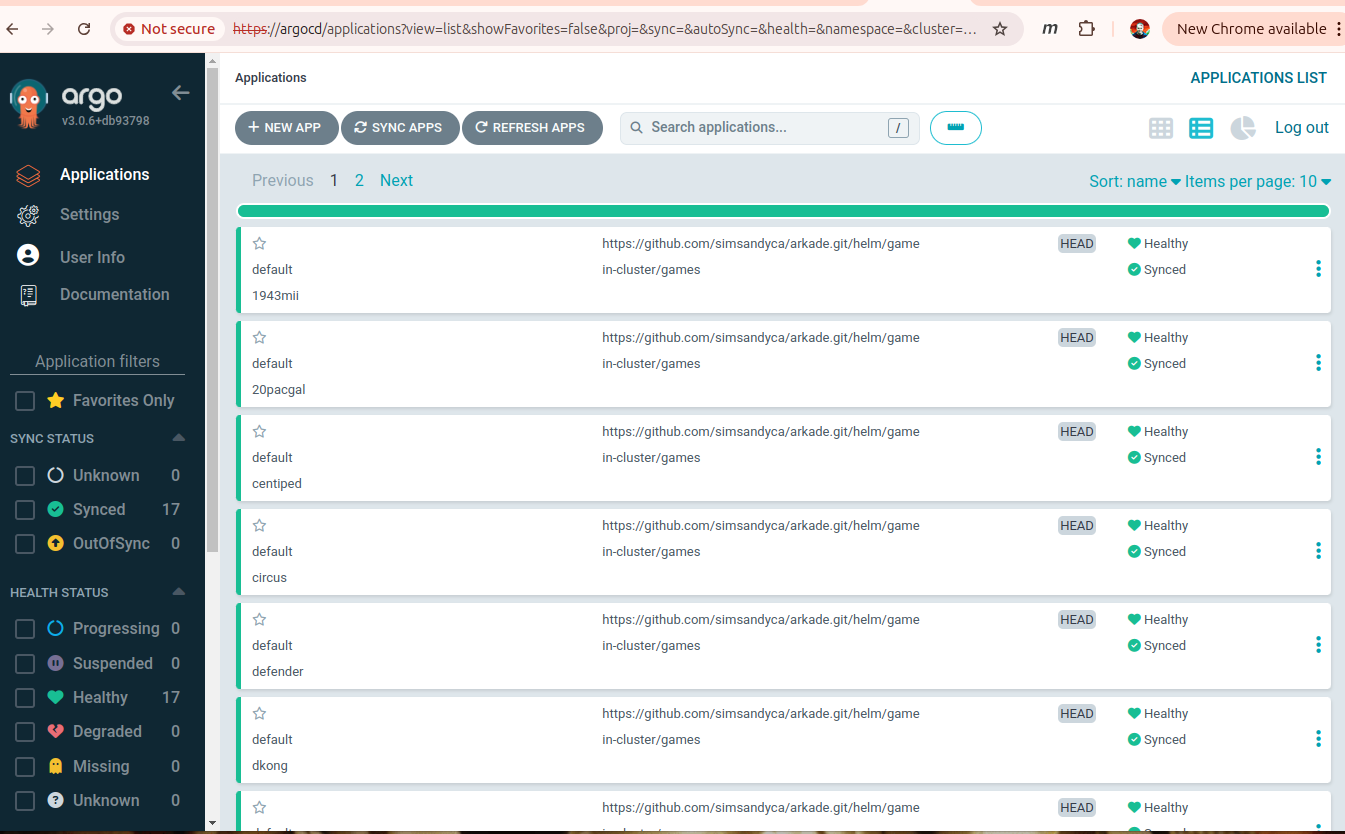
Ultimately I get this dashboard in ArgoCD with all the emulators running.
Sync is manual here, but the beauty of ArgoCD is that it tracks your git repo and can deploy the changes automatically.
Try It Out
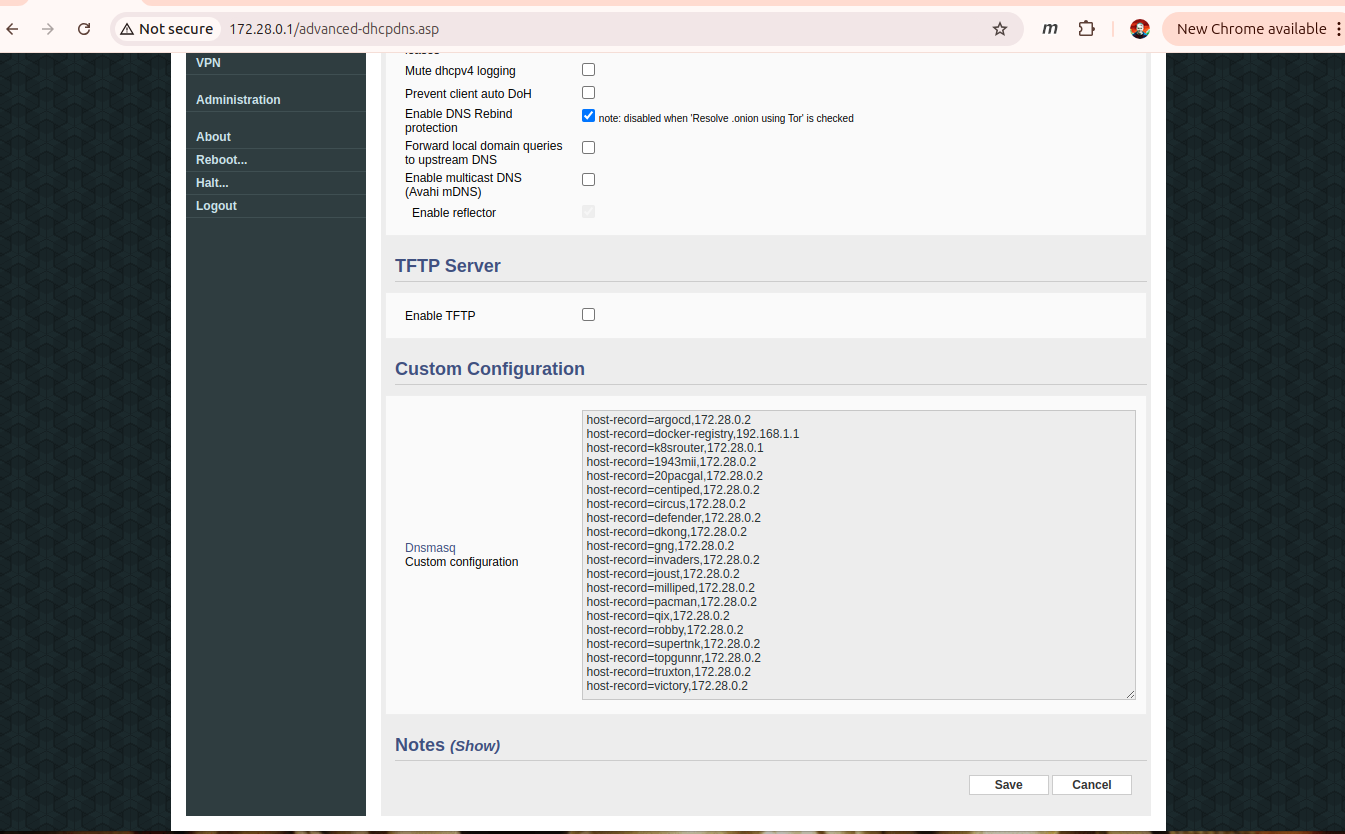
To use the IngressRoute, I need to add DNS entries for each game. The pi-cluster is behind an old ASUS router running FreshTomato so I can add those using dnsmasq host-records:
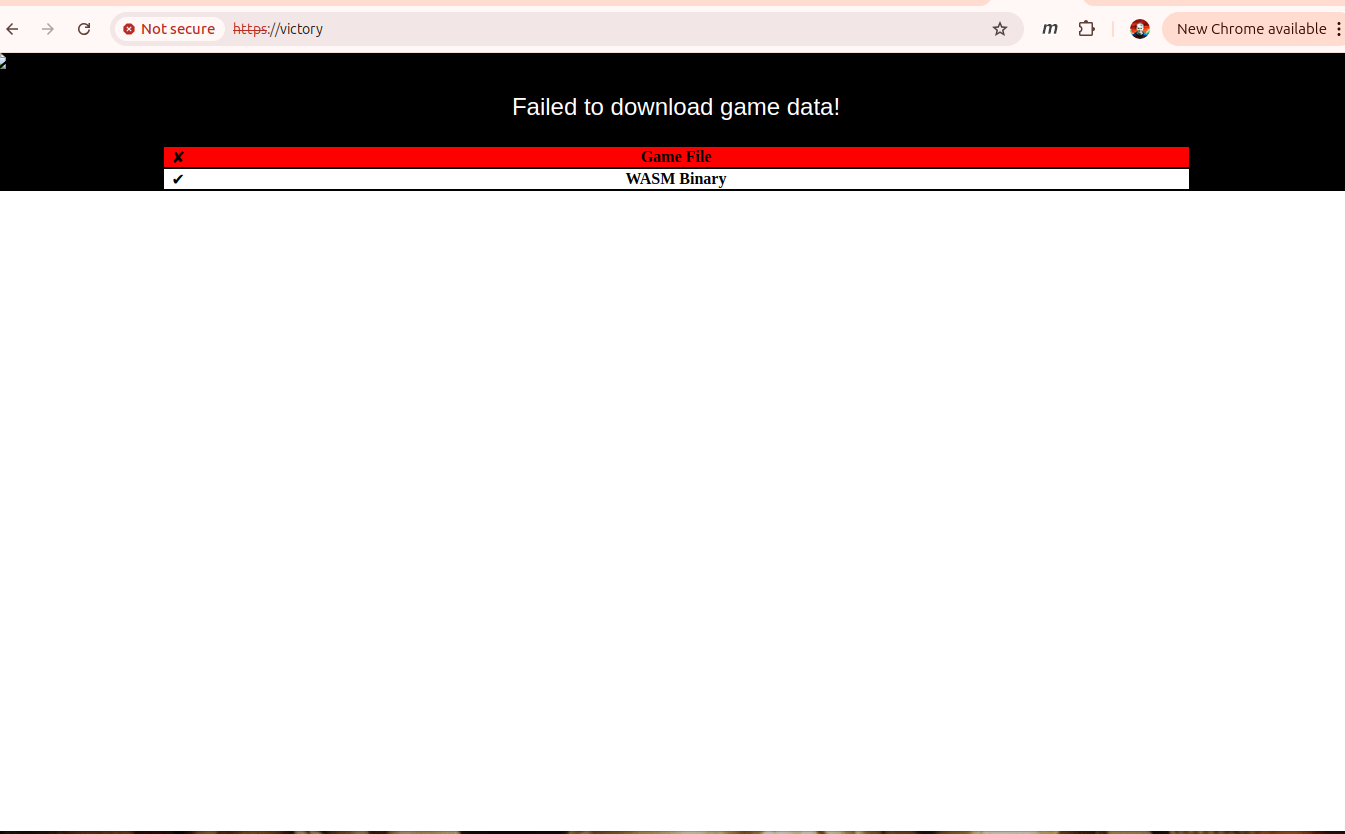
Let’s try loading https://victory
Oh that’s right no game roms yet. To test it out I’d need a royalty free ROM – there’s a few available for personal use on the MAME Project page. To load victory.zip I can do something like this:
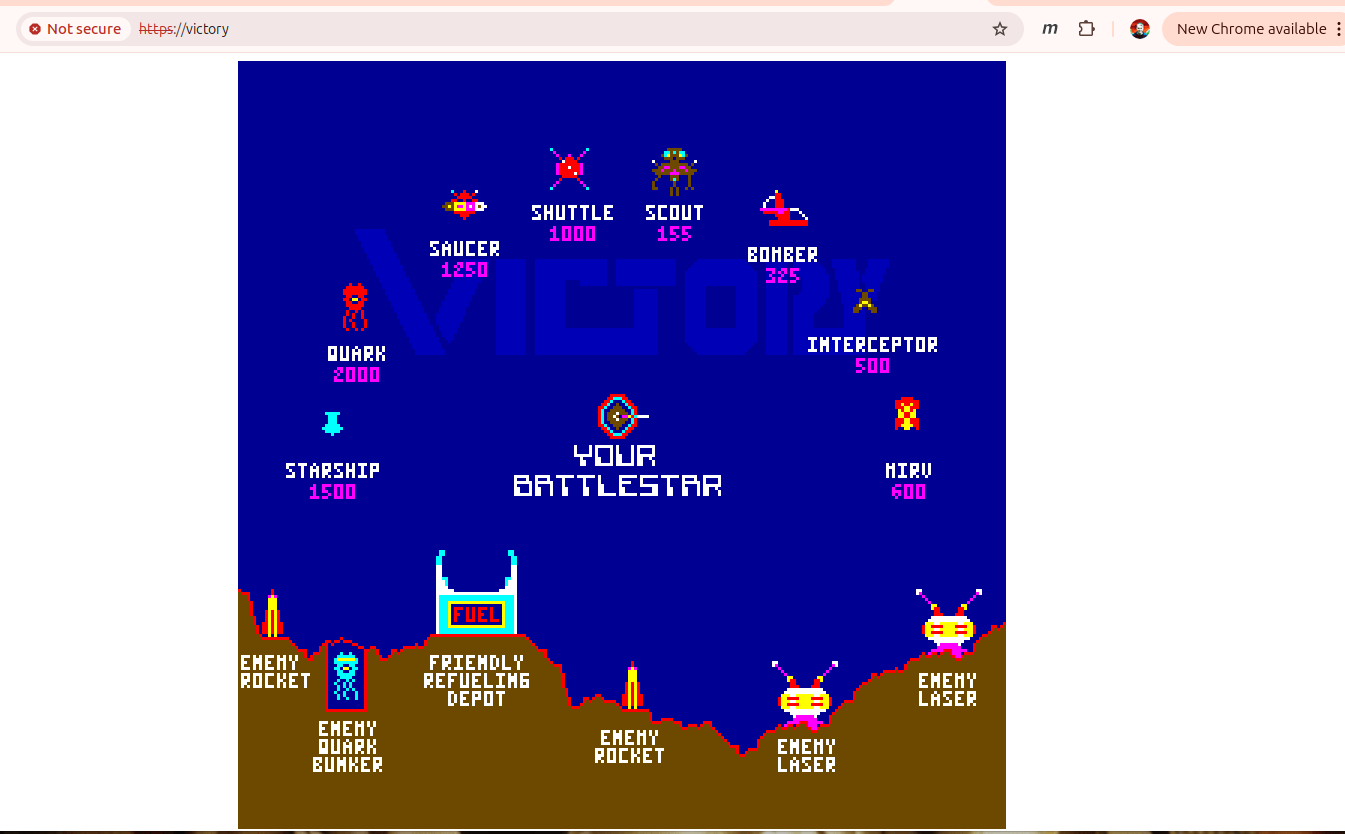
sandy@bunsen:~/arkade$ kubectl -n games get pod -l app.kubernetes.io/instance=victory
NAME                       READY   STATUS    RESTARTS   AGE
victory-5d695d668c-tj7ch   1/1     Running   0          12m
sandy@bunsen:~/arkade$ kubectl -n games cp ~/roms/victory.zip victory-5d695d668c-tj7ch:/var/www/html/roms/@sandy
Then from the bunsen laptop that lives behind the router (+- the self-signed certificate) I can load the https://victory and click the launch button…
On to CI/CD?
So far, this feels like it’s about as far as I can take the Arkade project. Is it full on continuous delivery? No – but this is about all I’d attempt with a personal github account running self-hosted runners. It’s close though – the builds are automated, ArgoCD is configured and watching for changes in the repo. There are github actions in place to run the builds. I’d still need some versioning on the image tags to have rollback targets and release tracking…maybe that’s next
Last entry I got my proof of concept arcade emulator going. I’m calling the project “arkade”. First thing was I setup a new github repo for the project. Last time I’d found that archive.org seems to use MAME version 0.239 and emsdk 3.0.0 – after some more trial and error I found that they actually use emsdk v3.1.0 (based on matching the llvm hash in the version string that gets dumped.
The docker image also has a full build of the latest version of MAME (I’ll use that later). The last command sets up the MAME and Enscripten versions that seemed to work.
The Game Images
That put the tools in place I wanted to move onto building up little nginx docker images one for each arcade machine. To get that all going the image needs a few bits and pieces:
nginx webserver and basic configuration
the emularity launcher and support javascript
the emulator javascript (emulator.js and emulator.wasm)
the arcade rom to playback in the emulator
That collection of stuff looks like this as a Dockerfile:
FROM arm64v8/nginx

ADD nginx/default /etc/nginx/conf.d/default.conf

RUN mkdir -p /var/www/html /var/www/html/roms

ADD build/{name}/* /var/www/html
Couple things to see here. I’m using the arm64v8 version of nginx because I’m gonna want to run the images in my pi cluster. The system will buildup a set of files in build/{name} where name is the name of the game.
So I setup a Makefile that creates the build/<game> directory populated with all the bits and pieces. There’s a collection of meta data needed to render a game:
The name of the game
The emulator for the game
the width x height of the game
MAME can actually output all kinds of metadata about the games it emulates. To get access to that, I build the full version of the emulator binary so that I can run that mame -listxml <gamelist>. There’s a target in the Makefile that runs mame on the small list of games and outputs a file called list.xml. From that, there’s a couple python scripts that parse down the xml to use the metadata.
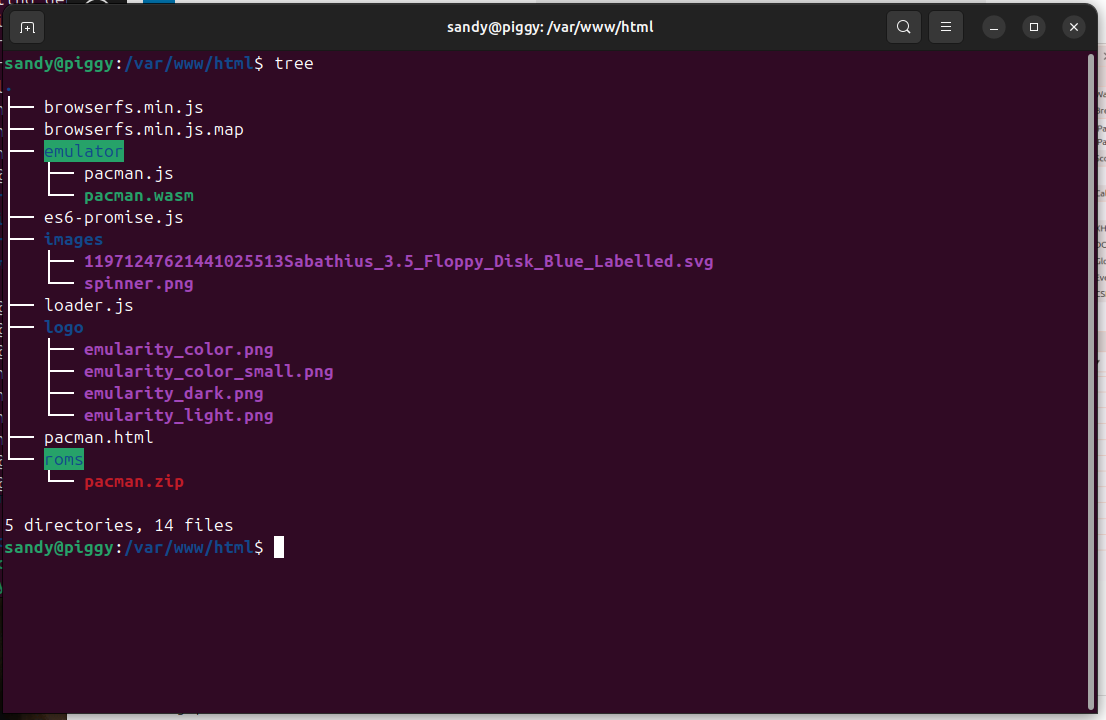
Ultimately the build directory for a game looks something like this:
The metadata shows up here in a few ways. The <title> field in the index.html is based on the game description. The nativeResolution is a function of the game display “rotation” and width/height. Pulling that information from the metadata helps get the game viewport size and aspect ratio correct. The name of the game is used to set the driver and rom name. There’s a separate driver field in the metadata which is actually the emulator name. For instance in this example, joust is a game you emulate with the williams emulator. Critically the emulator name is used to set the SOURCE= line in the mame build for the emulator.
There’s a m->n relationship between emulator and game (e.g. defender is also a williams game). That mapping is handled using jq and the build/<game>/<game>.json files.
Once the build directory is populated, it’s time to build the docker images. There’s a gamedocker.py script that writes a Dockerfile.<game> for each game. After that, it runs docker buildx build --platform linux/arm64... to build up the images.
Docker Multiplatform and Add a Registry
I do the building on my 8-core amd/64 server so I needed to do a couple things to get the images over to my pi cluster. First I had to setup docker multiplatform builds:
docker run --privileged --rm tonistiigi/binfmt --install all
I also setup a small private docker registry using this docker-compose file
sandy@www:/sim/registry$ ls config data docker-compose.yaml sandy@www:/sim/registry$ cat docker-compose.yaml version: '3.3'
sandy@bunsen:~$ kubectl get pods
NAME                        READY   STATUS    RESTARTS   AGE
20pacgal-77b777866c-d4dhf   1/1     Running   0          86m
sandy@bunsen:~$ kubectl port-forward --address 0.0.0.0 20pacgal-77b777866c-d4dhf  8888:80
Forwarding from 0.0.0.0:8888 -> 80
Handling connection for 8888
Handling connection for 8888
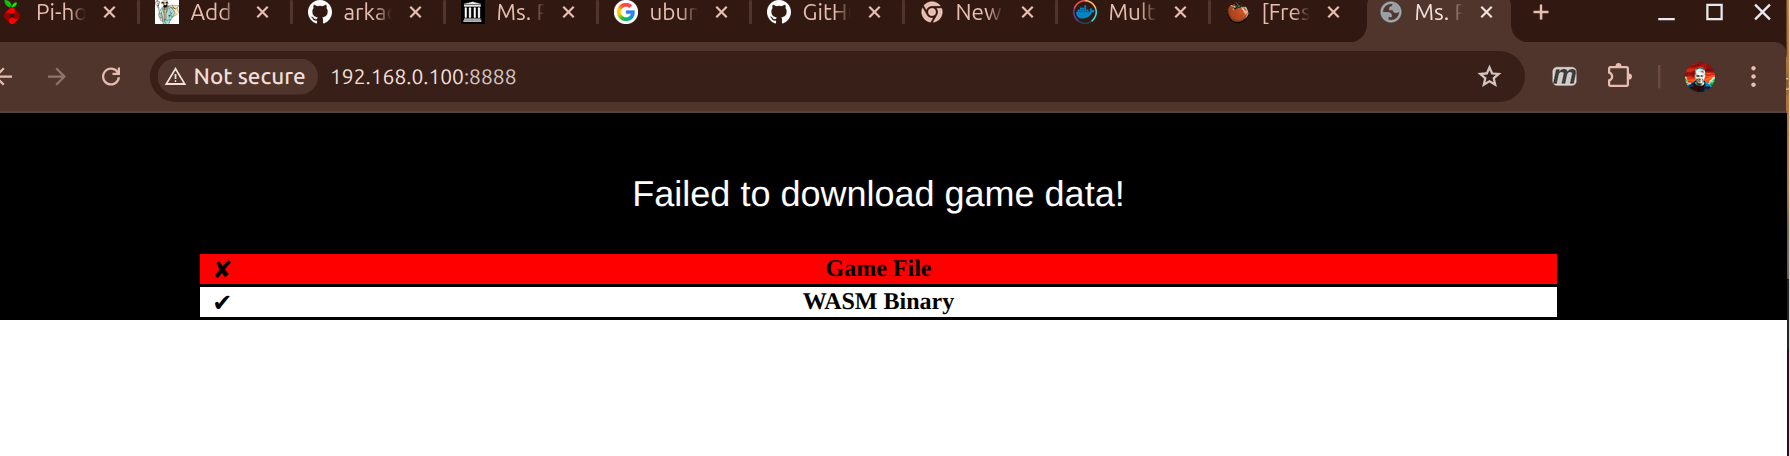
Almost there. The rom file is still missing – I’ll need to setup a physical volume to hold the roms…next time.
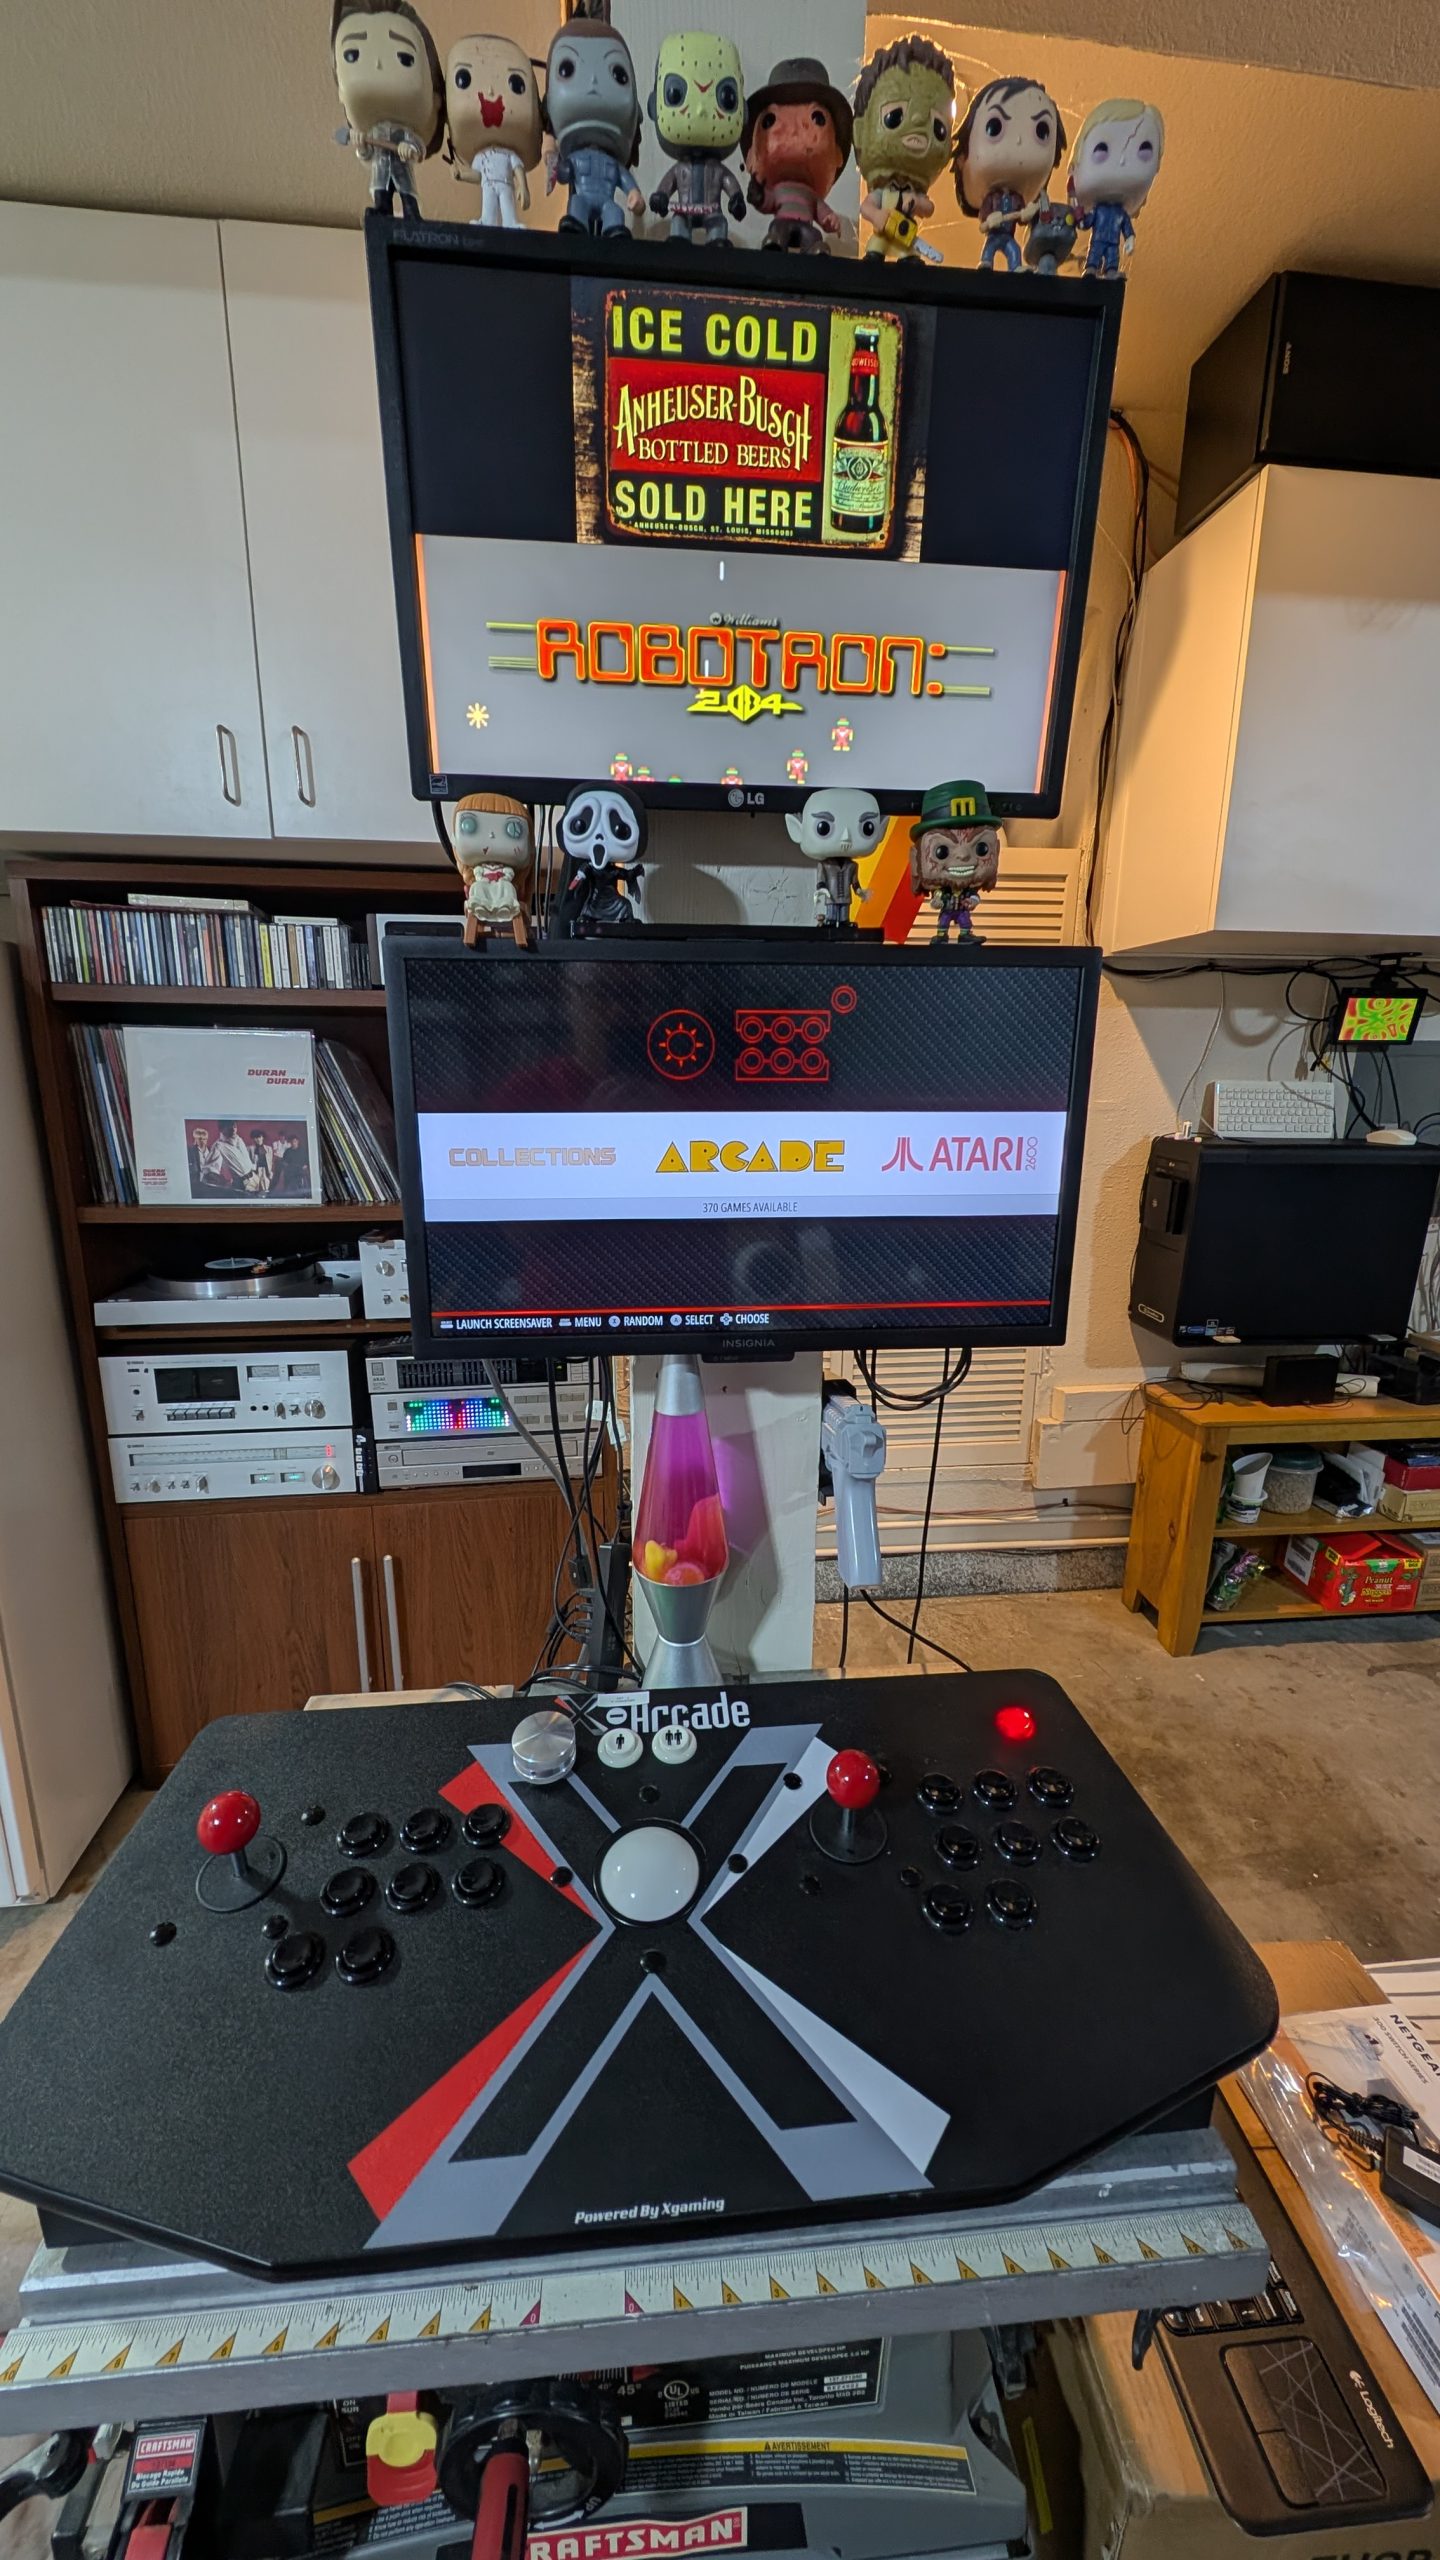
I’ve had a lot of fun retro gaming with a retropie system I setup last year. Maybe I could setup a virtual arcade in my little kubernetes cluster…
My RetroPie setup in the garage.
I’m thinking I’ll try to get a build of the Multi Arcade Machine Emulator (MAME) working. I went and got the code for MAME and built up galaxian and pacman emulators and bippidy, boppady, blah, blah, blah!
Not!
The JavaScript Emulator Build
Building a copy of MAME to run pacman went fine, but I wanted the javascript build and that was much harder to get going – which was frustrating because it’s already out there on the Internet Archive working! I guess I could just go grab a copy of their javascripts, but I want some sort of repo to build off of so that I’ll be able to demo some gitops – like maybe ArgoCD.
Not sure, the javascript build seems like the ugly step child of MAME but the instructions didn’t work for me. Anyway, – not bitter – here’s what I did to get it working. It’s a pretty power hungry build, so I do it on my main server.
That should output some files like pacjs.jspacjs.wasm and pacjs.html
It’s been a couple days since I started working on this…I’m pretty sure that initial build finished fine. But there’s a big difference between a finished build and a working build.
Setup nginx To Serve the MAME Emulator
You then have to setup a webserver and copy in most of the files from Emularity and create a html page to point to it all. Emularity is some javascript that makes it easier to launch the MAME emulator.
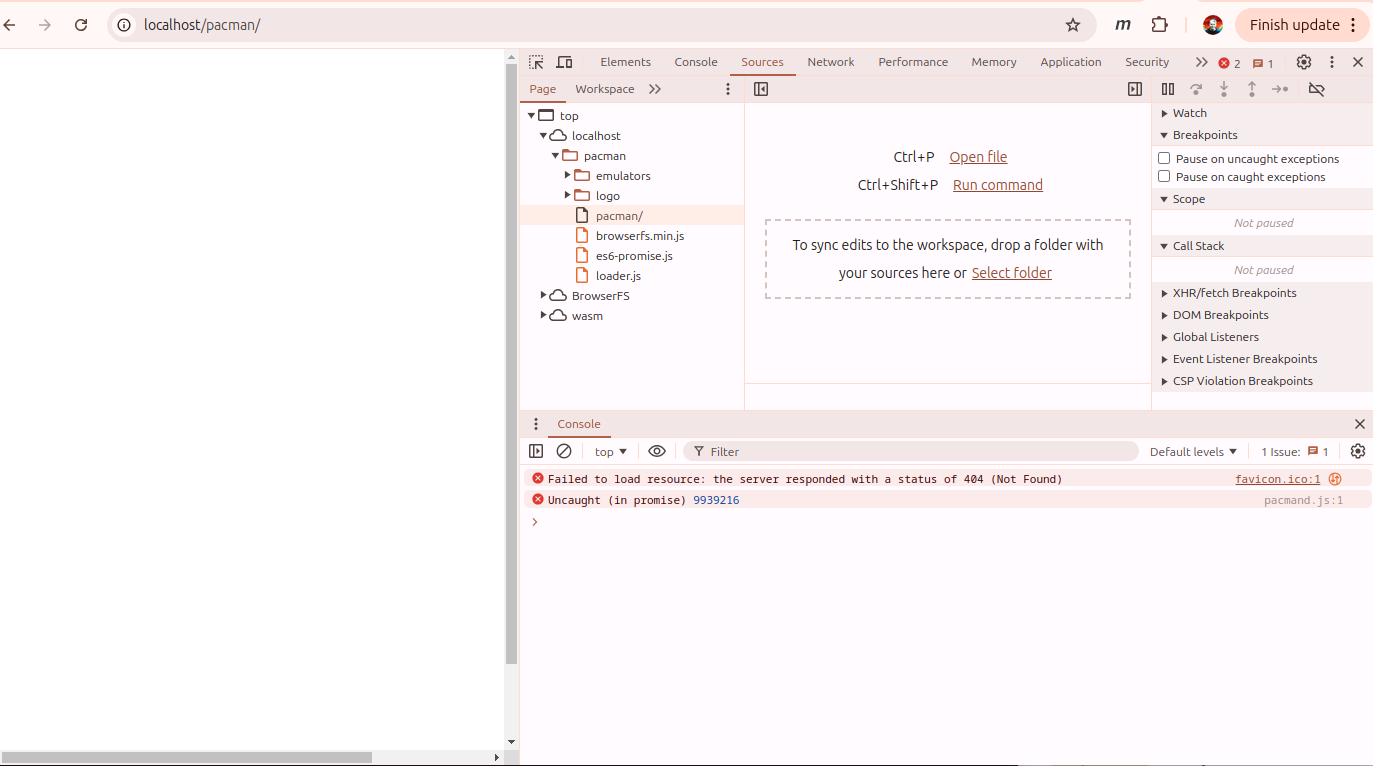
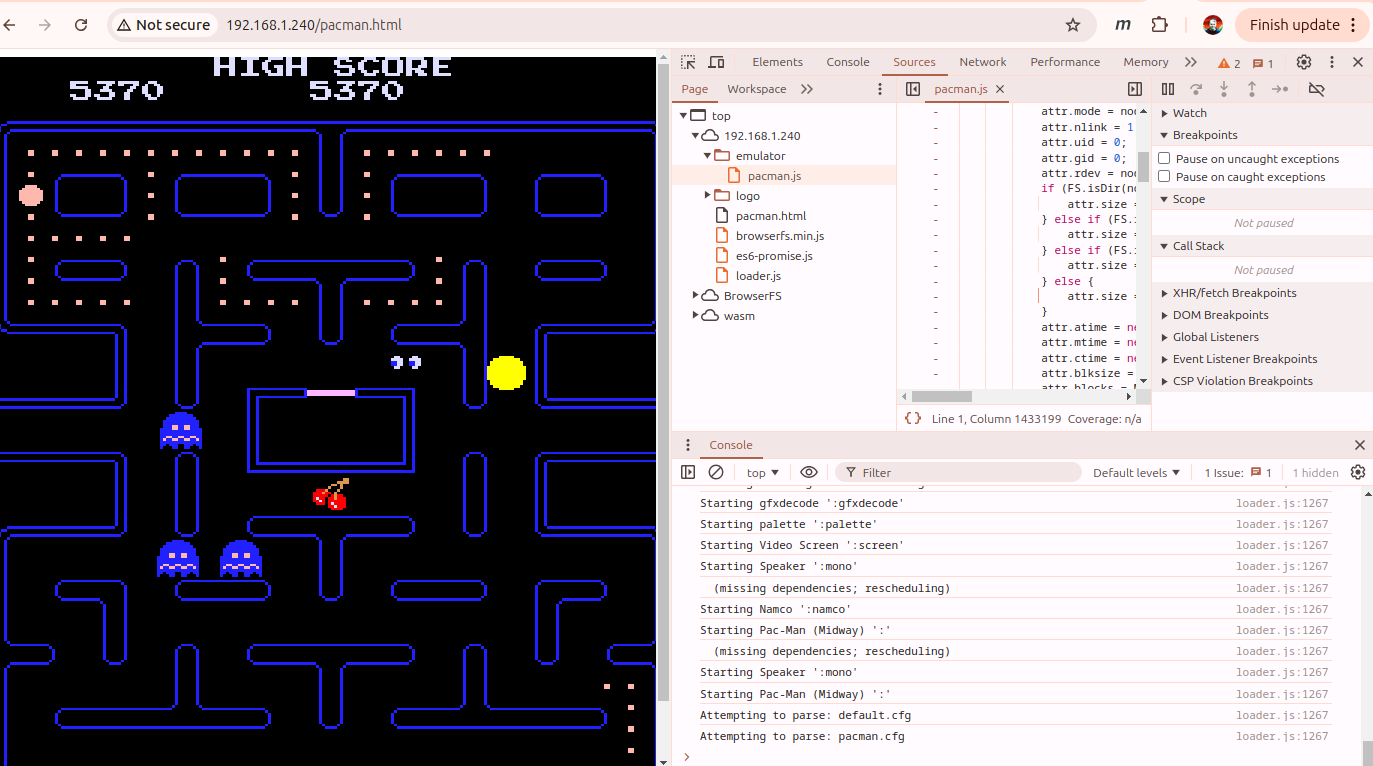
Great but it didn’t load… It just crashed out with an Uncaught (in promise) error (with some random addr).
There isn’t a ton of info on this build system. I did find this post that implied that there’s some version matching that has to go on. The javascript version is basically the binary build of a C++ application massaged into web assembly by emscripten.
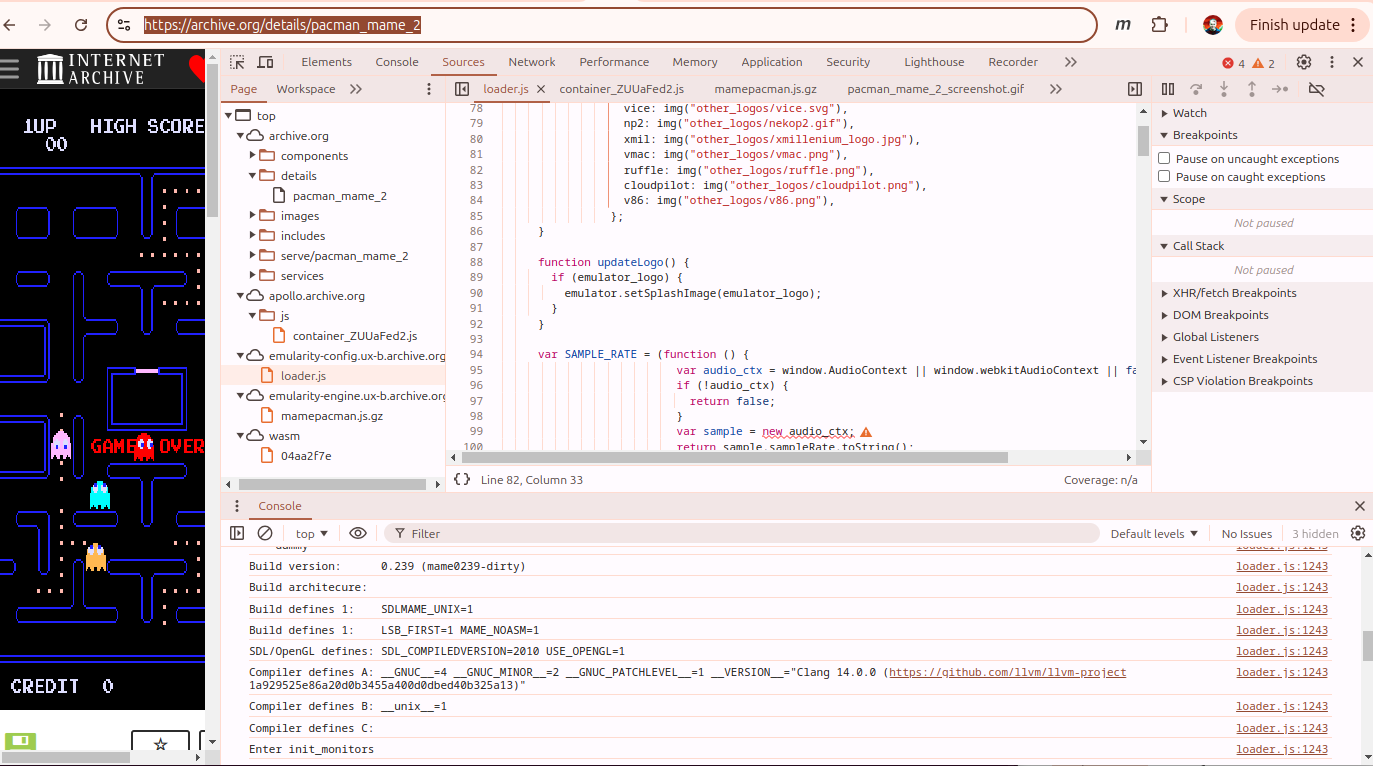
I hacked around for a couple days trying to add symbols and debug in the code and trying to get a break point in the javascript console. Ultimately, I kinda cheated and just tried to have a look at what the Internet Archive had done.
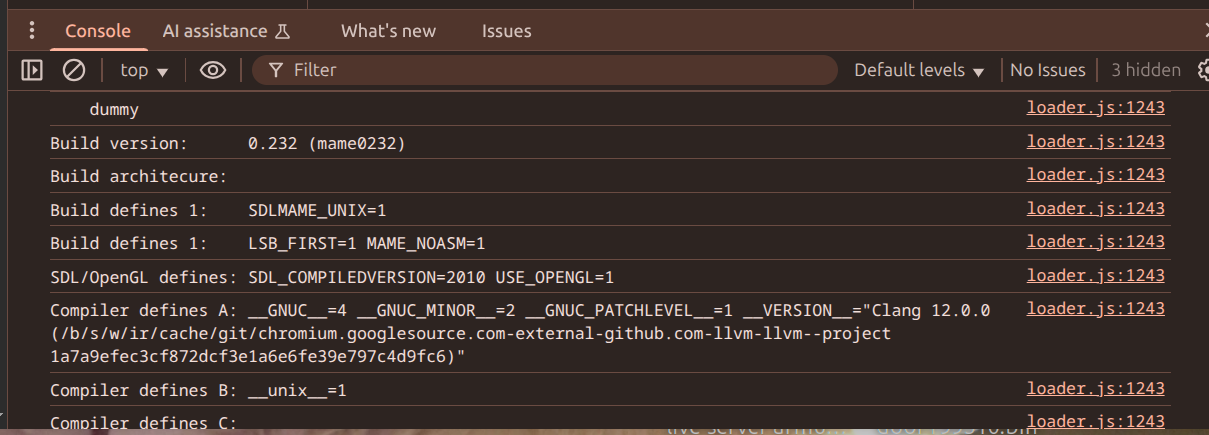
If you look in the console on a successful run you can see that the MAME emulator is run with -verbose on so you get a dump of a couple things:
Version Trouble
Critically, they’re running the build on version 0.239 of MAME. Figuring out the emsdk version was a little harder – but I could see they are running Clang 14.0.0 from llvm tools. You can run ./emsdk list to list the emscripten versions. Ultimately by playing with it a bit (sort of loop over testing different versions of emcc – ./emsdk install 2.0.0; ./emsdk activate 2.0.0; source ./emsdk_env.sh; emcc -v) I settled on version 3.0.0 which had Clang 14.0.0. There’s tags in the MAME repo for each version so to get my build working I did this:
First is that in this older version of MAME, the SOURCES are in a different place src/mame/drivers/pacman.cpp instead of src/mame/pacman/pacman.cpp
Next, the EXCEPTION_CATCHING_ALLOWED clause was required. To get a list of functions where catching is allowed, I had to enable DEBUG=1 and SYMBOLS=1 and OPTIMIZE=0 to get a better trace of the stack on that crash. That bit is probably the biggest part of the fix. It seems like there’s some async loading of the webassembly going on. That exception needs to be caught (and likely ignored) so that a retry can be attempted
The default compiler optimization level in the MAME build is OPTIMIZE=3 – I found pacman a little choppy at that level, so I increased it to OPTIMIZE=s – it runs smooth and makes the download smaller too.
So now it’s working at least as a proof of concept. Hooray.
In the image I’m just running nginx on my pink macbook air the web site files look like this:
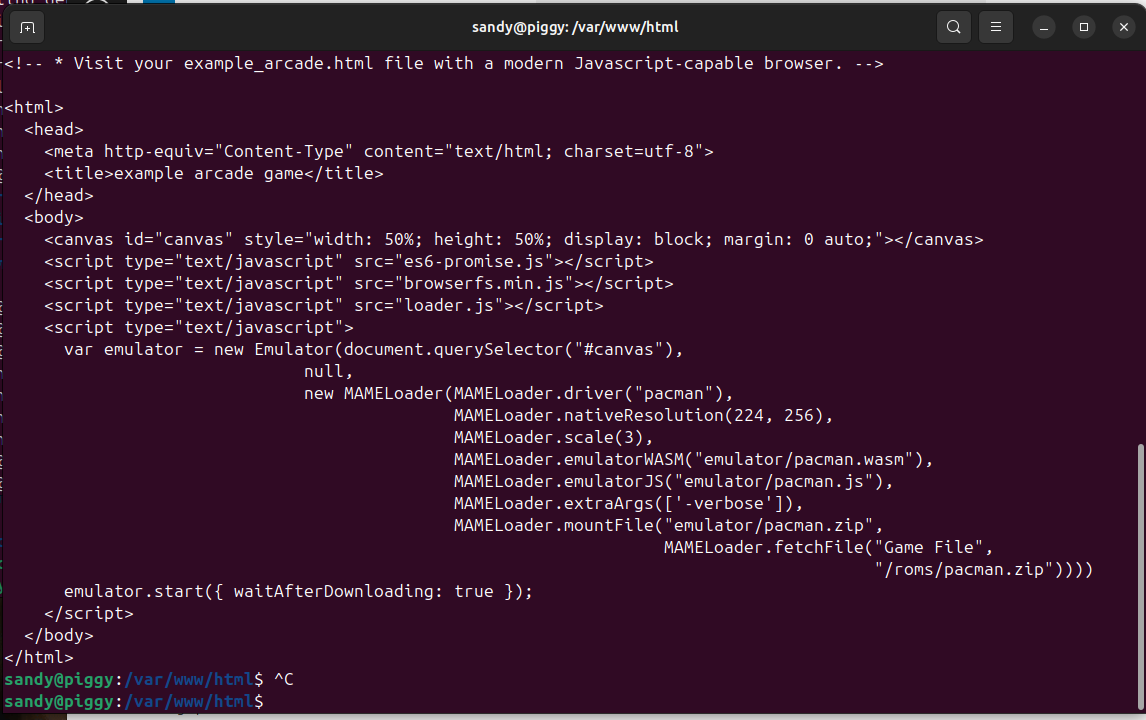
Then the final pacman.html that runs the loader looks like this:
The extraArgs call was a good find too. You can pass args like -showconfig in there which help you trouble shoot where to put the rom file etc.
I know I started by saying I was gonna deploy something into a kubernetes cluster – but I’m a little fried from the hacking I’ve done already. All in all, it was a lot of fun hacking on a C++ / WebAssembly build. Next time I’ll go onto automating the build for a couple games and dockerizing the results.
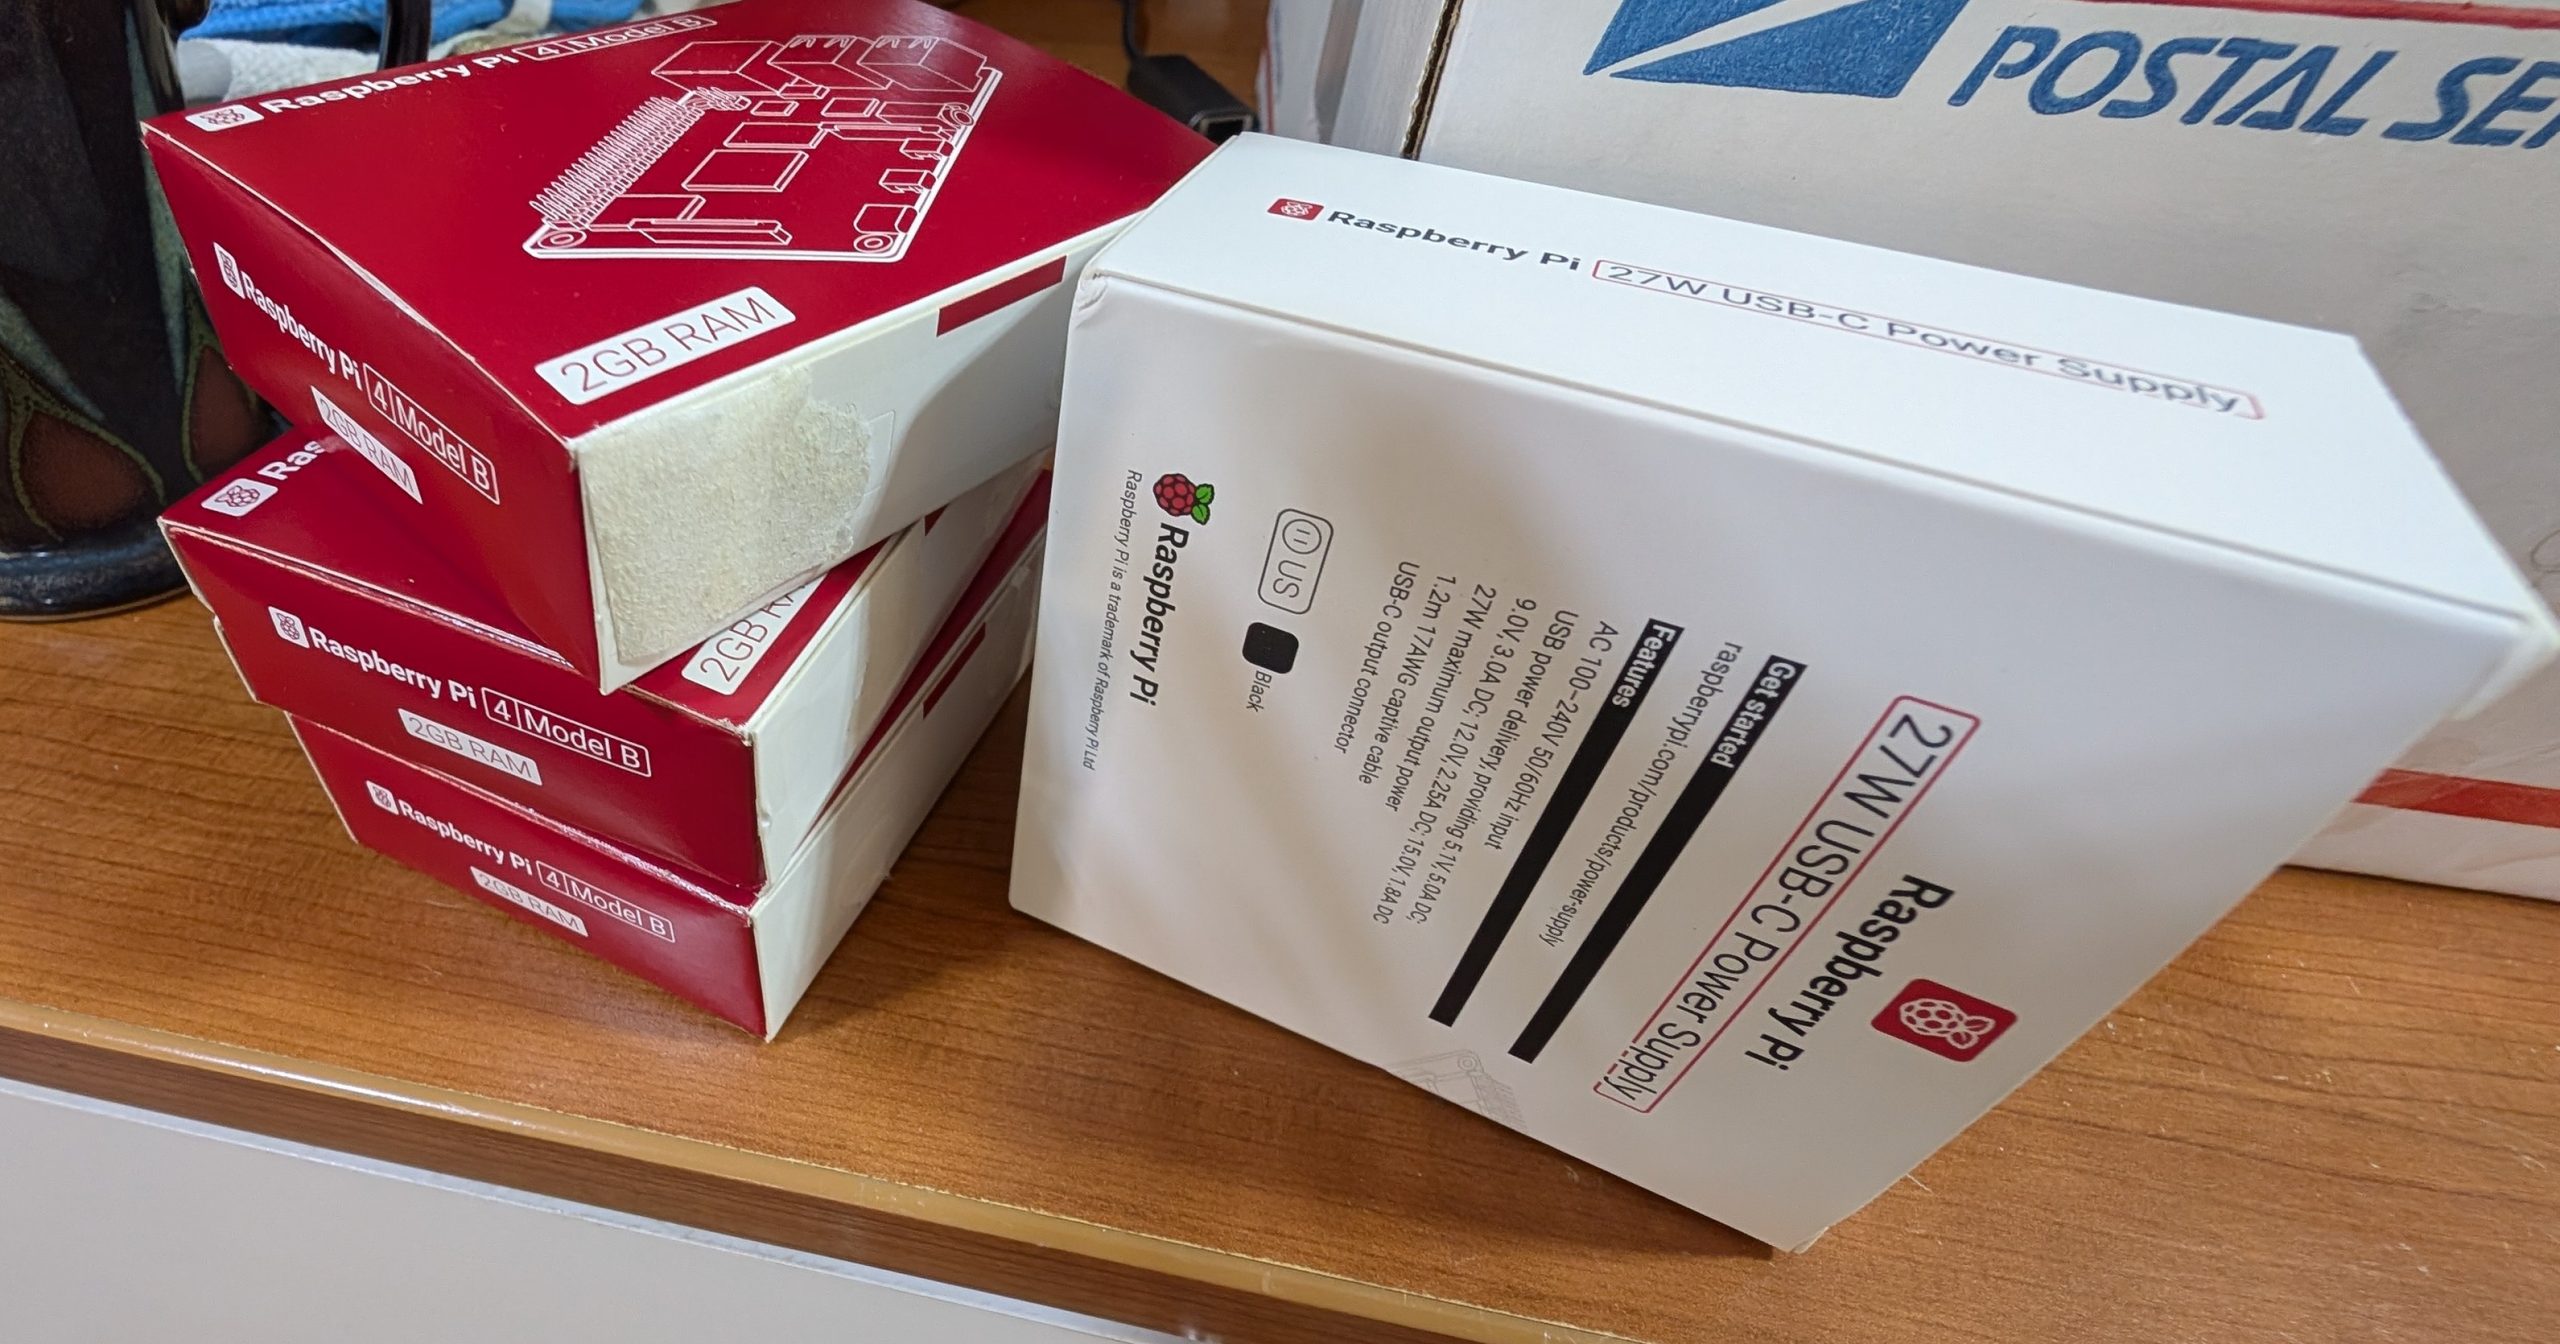
I always seem to have a drawer-full of Raspberry Pi’s in the garage that aren’t doing anything, so I thought I’d hook them to an old router and try to make them into a kubernetes cluster. I’ve got an old think pad in the mix I’m hoping to network that in and set it up as a boot server using the rpi-imager and cloud-init.
A side goal was to have the nodes auto deploy sort of like a mini cloud provider. To head towards auto install I took a cue from the rpi-imager. When you plugin a rpi with a blank SD card it will run a little code from eeprom and after looking around for something to boot will eventually hook eth0 to the network using DHCP. Then it downloads a boot.img from downloads.raspberrypi.org.
That boot.img contains the rpi-imager binary so after a reboot the imager appears with a preconfigured list of rpi hardware, OS types and install target. – Cool – but not very automatic and I don’t really want to pull the node images from the internet everytime. Also when I go to redeploy, I’d rather not have to pull out each SD card and wipe it first.
I sort of settled on running ubuntu/noble and wanted to use cloud-init to configure a couple things like unique hostname and timezone and to install k3s-agent on the nodes.
HTTP_BOOT
The little bit of magic that hooks up the DHCP network connection and pulls the rpi-imager boot.img is known as HTTP_BOOT. It’s a bit of code and settings that live in the eeprom of the pi. You can update the eeprom with a custom URL for HTTP_BOOT something like this boot.conf file:
The [gpio8=0] block tells the pi to pull a boot.img from http://172.28.0.3/rpi-imager (but only when the general purpose I/O pin #8 is grounded – more on that later). HTTP_BOOT actually pulls two files from that URL – the boot.img and a signature file called boot.sig.
Out of Band Control
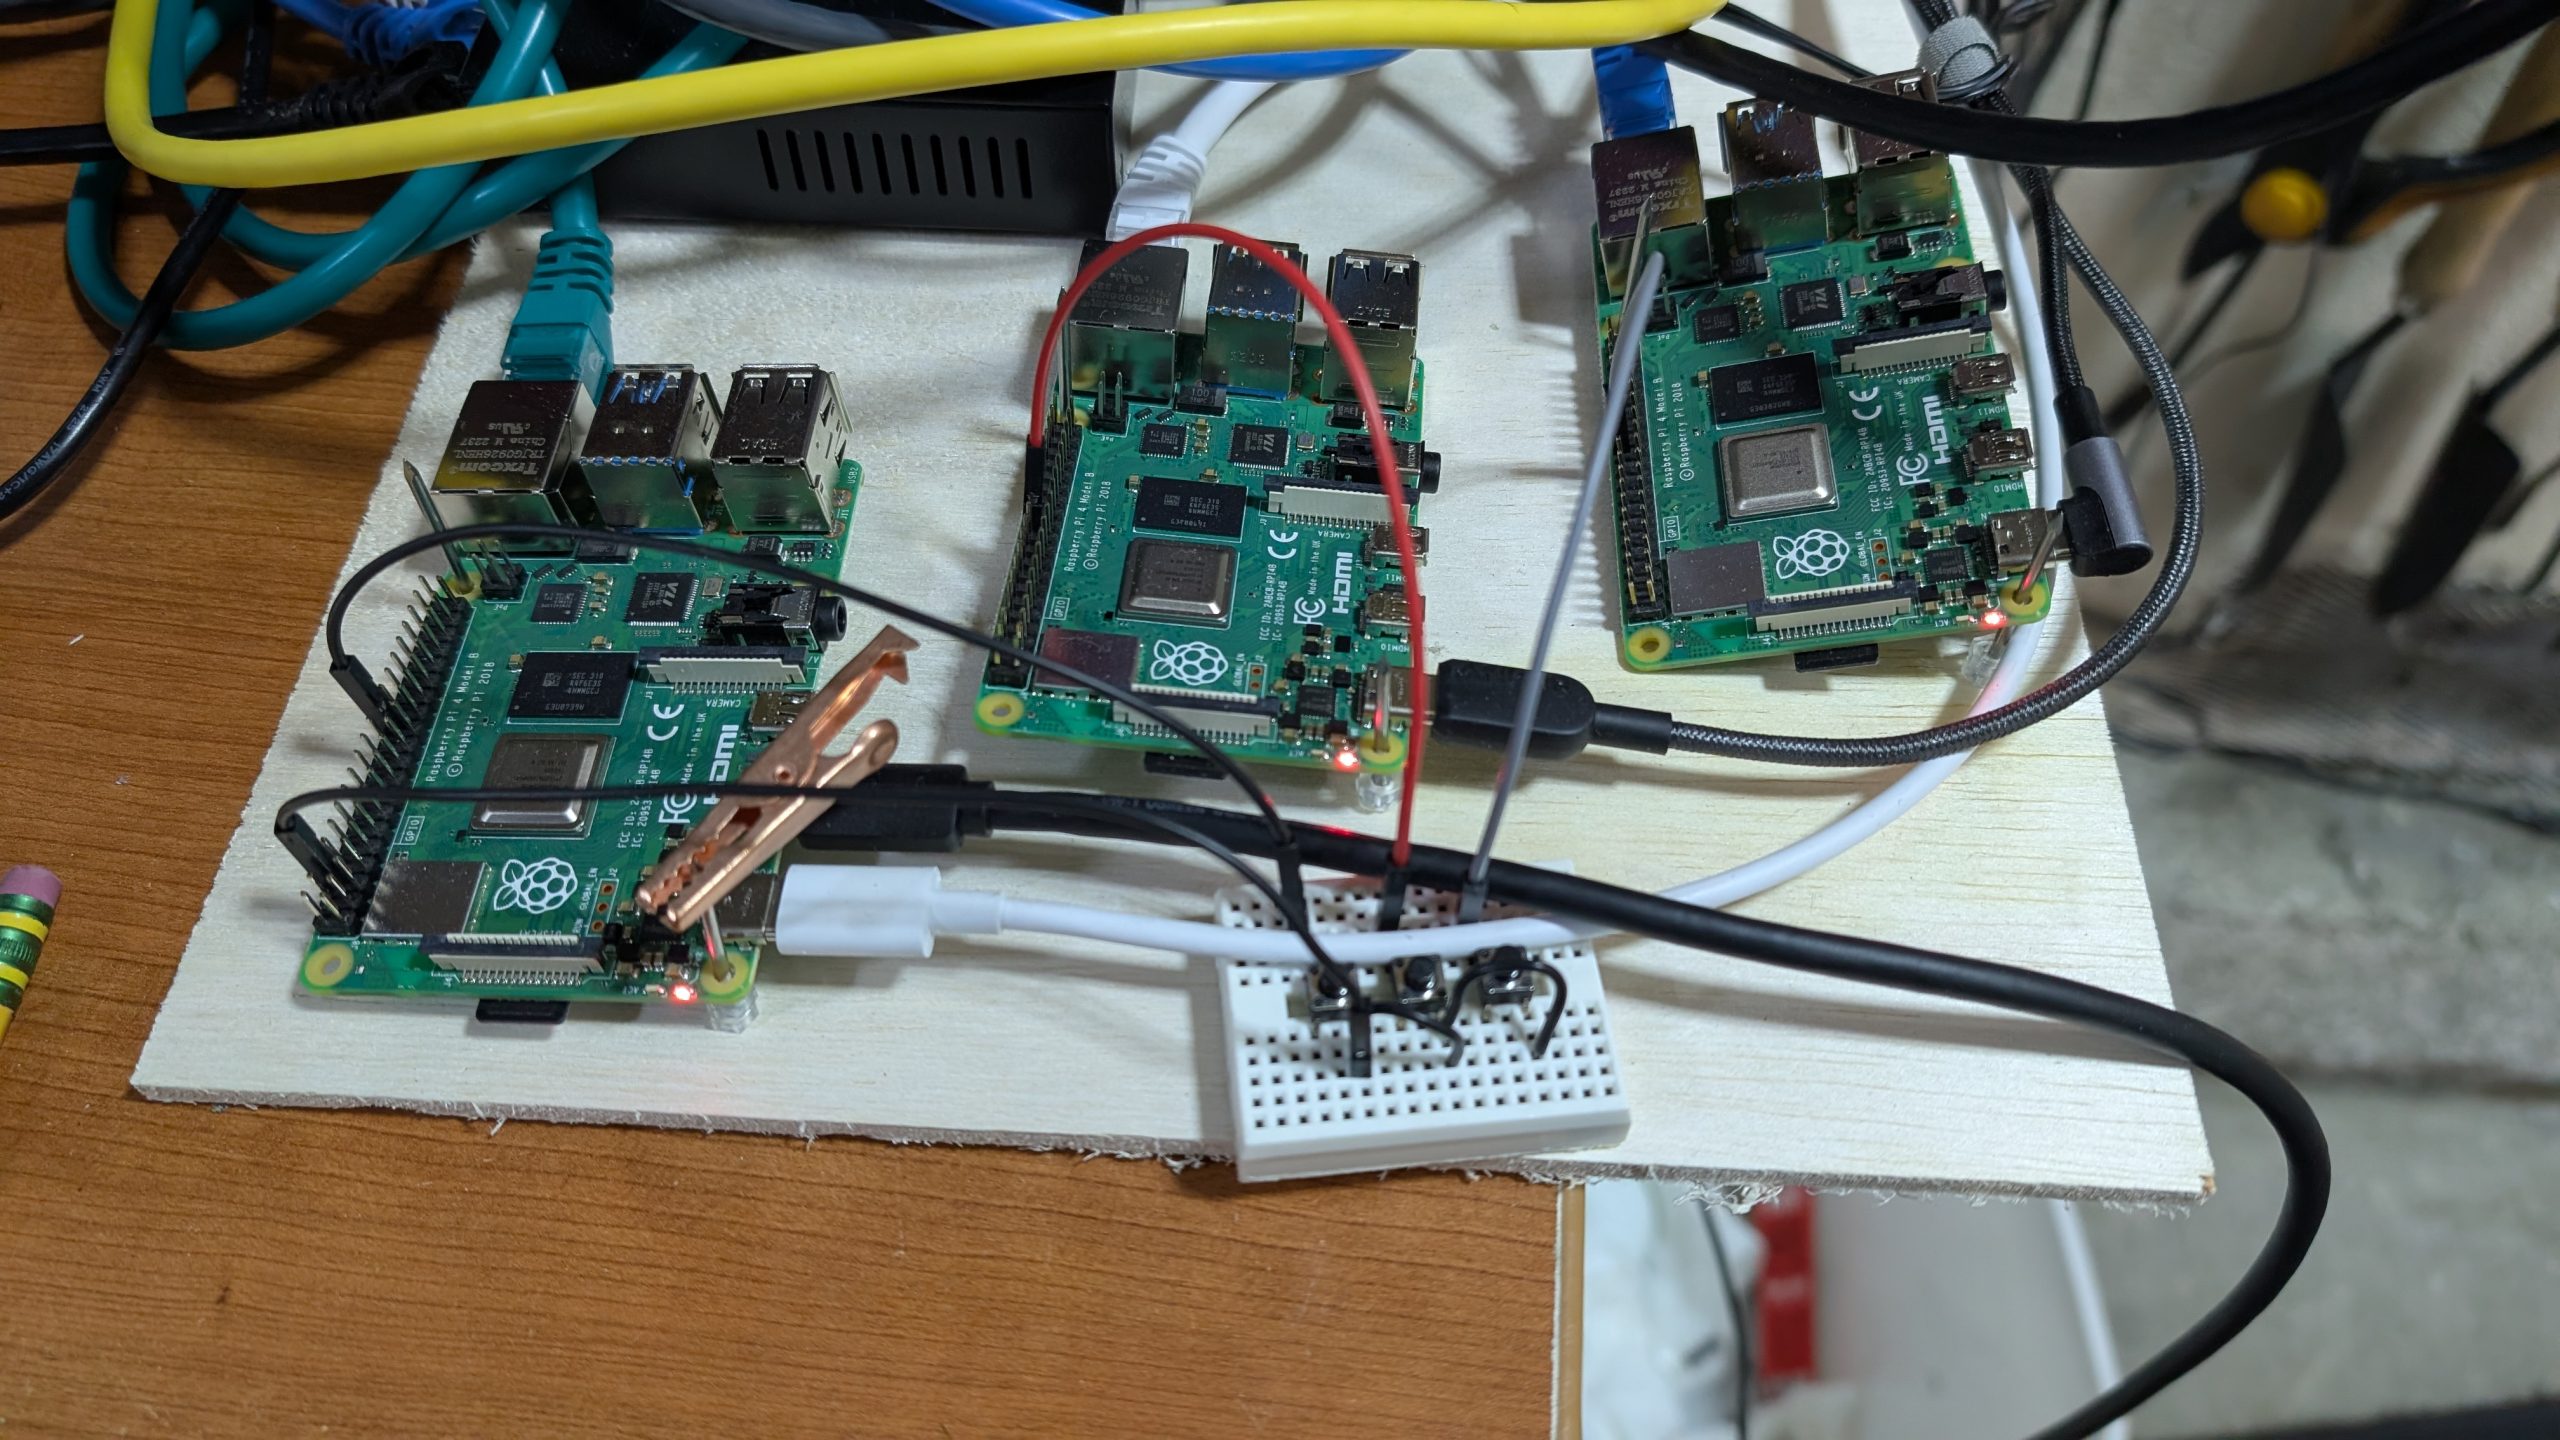
My “cluster” is a board with an old router zip-tied down and three rpi4 mounted on finish nails I drove through the plywood. I ran jumpers from GPIO8 and the GRND pins on the pis to a bread-board with momentary buttons. To reboot a pi4 you can ground the “RUN” pad in the J2 jumper block (I’ve got a ground wire with a Dupont prong on it to touch the run pad).
To cause an automatic reinstall, I hold down one of the buttons and ground the run pad of the corresponding pi. I could automate my out of band controller with relays and maybe something like an esp32 to drive it.
Signed Boot Objects
When the pi boots up and pulls boot.img it doesn’t just trust that random code from the internet it checks the boot.img against boot.sig. The eeprom contains a public key and boot.sig was created using the Raspberry Pi Foundation’s private key.
To make a custom boot.img or even a boot.conf you need your own key pair and run extra commands to sign things. So let’s do that and sign the boot.conf:
Here I’ve used the private.pem key to create a signature file for boot.conf (boot.conf.sig). Then I copied the public key, and boot.conf files onto a nginx server I’m using as my boot server (172.28.0.3).
Updating the eeprom on the pi
I log into one of the pi computers and update the eeprom like this:
I cloned in the rpi-imager code from github and built it up following the instructions in the README.md. The build takes a long time (maybe an hour). Ultimately, the repo builds an AppImage version of the general portable imager – which wasn’t what I wanted. Confusingly, the README.md mentions the “embedded” version of the imager, but the default git branch ‘qml’ doesn’t support the embedded build.
To build the embedded version I had to git checkout v1.8.y first. All in all, it goes something like this:
git clone https://github.com/raspberrypi/rpi-imager.git
cd rpi-imager
sudo ./build-qt.sh # and wait
git checkout v1.8.y
cd embedded
./build.sh
Honestly I’m not sure if the initial ./build-qt.sh is required – likely since that builds up the arm64 version of the Qt libs needed for the imager interface. Ultimately the embedded/build.sh should create an output directory with a minimal linux OS. I found it was just easier to do most of the embeded build stuff as root user. Don’t be a dolt like me and delete the output directory. There’s a cmdline.txt file in there if you delete it, the kernel can’t boot. Pro-tip, you can remove the quiet cmdline arg to see how the kernel boots up.
Packup the boot.img
The output directory needs to be packed into a FAT32 file system. I wrote a script called pack.sh to do that.
#!/bin/bash
LOOP=$(losetup -f) echo "LOOP is $LOOP" if [[ ! -f boot.img ]] then dd if=/dev/zero of=boot.img bs=1M count=36 losetup -P $LOOP boot.img mkfs.vfat $LOOP else losetup -P $LOOP boot.img fi echo "mount $LOOP boot" mount $LOOP boot cd output cp -rp * ../boot cd - umount boot losetup -d $LOOP
pack.sh makes a 36MB boot.img file and then binds it to a loop device. The loop device is mounted as a directory called boot and the contents of output are copied in. Then the script signs the boot.img file with the private key from before. Then I copy those to the boot server.
Hacking the rpi-image Service Script
Great, but that’s just the same rpi-imager signed with a different key. To customize it I needed to learn a bit about buildroot. The boot.img does a minimal boot and then starts rpi-imager as a service. The service startup script is in a buildroot overlay rpi-imager/embedded/imager/board/overlay/etc/init.d/S99-rpi-imager. So I hacked on that:
#!/bin/sh
# # Script executed at start #
case "$1" in start) #udevd --daemon #udevadm trigger INTERVAL=10 # Polling interval in seconds
echo "Waiting for eth0 to connect..."
while true; do # Check if eth0 is up using /sys/class/net if [ -d /sys/class/net/eth0 ] && [ "$(cat /sys/class/net/eth0/operstate)" = "up" ]; then echo "eth0 is now connected!" break else echo "eth0 is down, checking again in $INTERVAL seconds..." sleep $INTERVAL fi done ifconfig
This version of the “service” runs rpi-imager in --cli mode with two arguments: a URL for an image to etch on the SD card, and the device file of the card (/dev/mmcblk0). The URL points back to my boot server. I had to add a block to wait for the network to connect – if you just run the imager without the network it fails (at least in cli mode). There’s two partitions in the ubuntu image: a boot partion (mmcblk0p1) and the main system partition (mmcblk0p2). The wget for latest makes the Ubuntu version variable (I just update that on the webserver when I add a new image file).
The script goes on to mount the newly created boot partition and drops files called user-data and meta-data which are used by cloud-init. The .../cloud-init/... URLs are actually php scripts on the boot server that take a device serial number as an argument. That lets me customize the hostname and instance_id of the node using the pi serial number as a unique identifier.
Finally, the service script tells the pi to reboot. When it reboots, it will use the [all]boot.conf (because I’ve released the button that grounded GPIO 8). Since there’s a freshly populated version of Ubuntu on the SD card it boots that.
cloud-init custom user-data / meta-data
If you put a file called user-data in the boot partition of that ubuntu/noble server image, then cloud-init will run on first boot and apply any changes specified in the file. Here’s what my finished user-data and meta-data look like:
# This is the meta-data configuration file for cloud-init. Please refer to the
# cloud-init documentation for more information:
#
# https://cloudinit.readthedocs.io/

# Set the datasource mode to "local". This ensures that user-data is acted upon
# prior to bringing up the network (because everything about the datasource is
# assumed to be local). If you wish to use an HTTP datasource instead, you can
# change this to "net" or override it on the kernel cmdline (see README).
dsmode: local

# Specifies the "unique" identifier of the instance. Typically in cloud-init
# this is generated by the owning cloud and is actually unique (to some
# degree). Here our data-source is local, so this is just a fixed string.
# Warning: changing this will cause cloud-init to assume it is running on a
# "new" instance, and to go through first time setup again (the value is
# compared to a cached copy).

instance_id: rpi-123456789
The user-data has instructions there to set a hostname for the new node of the form “node-serial#”. Install some packages, setup a ubuntu user. At the end it installs the k3s-agent and registers it with the control-plane node at 172.28.0.2. There’s also some node configuration to support k3s: setting the docker-registry, enabling cgroups on the kernel cmdline.txt and doing some sysctl changes to help support containerd.
The php that fills that in looks like this cloud-init/user-data:
...
# Warning: changing this will cause cloud-init to assume it is running on a
# "new" instance, and to go through first time setup again (the value is
# compared to a cached copy).
<?php
   include_once('config.php');
   echo "instance_id: $instance_id\n";
?>
and cloud-init/config.php
<?php $cp_serial_number='6c...65f';
// control plane ip is set by DHCP on the router $cp_url="https://172.28.0.2:6443";
$serial_number='12345'; if (isset($_GET['serial_number'])) { $serial_number=$_GET['serial_number']; } $model='Pi4'; if (isset($_GET['model'])) { $model=$_GET['model']; } $node_type='worker'; if ($serial_number == $cp_serial_number) { $node_type='control-plane'; } $node_name="node-$serial_number"; $instance_id="rpi-$serial_number"; ?>
There’s some hard-coding in there for things like the control-plane node serial number (I’ve got 3 pi4s and the control-plane is a pi5). I get the node-token from the control-plane automatically with a ssh command. And the kubeconfig to access the cluster comes from /etc/ranger/k3s/k3s.yaml). The idea is you bring up the control-plane and once it starts answering ssh you can automatically roll the other nodes.
Check The Nodes
Finally, with the nodes initialize and the k3s.yaml brought in and edited to point at the control plane, I can check them with kubectl:
sandy@bunsen:~$ kubectl get nodes
NAME                    STATUS   ROLES                  AGE     VERSION
node-100000001b5d3ab7   Ready    <none>                 4h23m   v1.33.3+k3s1
node-100000008d83d984   Ready    <none>                 5h4m    v1.33.3+k3s1
node-10000000e5fe589d   Ready    <none>                 5h1m    v1.33.3+k3s1
node-master             Ready    control-plane,master   47h     v1.33.3+k3s1
Success!! Now what will I build in my pi cluster?…
this is my fork of the v1.8.y branch with the embedded build – I’m just running the embedded/build.sh now and it definitely references Qt libs and headers so I’m thinking to build this you need to checkout the qml branch and run sudo ./build-qt.sh – then checkout the cli_boot_server branch and cd embedded; ./build.sh (probably all as root).
I went down a whole rabbit hole with this post about the boot.img format and another project that makes a custom boot.img – It’s actually possible to download The Pi Foundation boot.img unpack it – then unpack the rootfs.cpio.zst within and get at the S99rpi-imager service script – edit that and repack it all – then re-sign the root.cpio.zst pack/unpack commands look sort of like this
losetup -f # note next available loop dev
losetup -P /dev/loop15 ./boot.img
mount /dev/loop15 /mnt/boot
mkdir rootfs
cd rootfs
zstdcat /mnt/boot/rootfs.cpio.zst | cpio -dmvi
vi etc/init.d/S99rpi-imager
… make your edits (you only get 32MB so don’t go too crazy – and the level must be the max:19 in the zstd compressor)…
this is the project ref’d in the above thread – I did build the boot images in that repo – and that’s how I figured out the format of the output directory and how to unpack and repack boot.img and rootfs.cpio.zst
Node labels for serial_number and model were a later addition when I added grafana monitoring. You add node labels for the k3s nodes in /etc/rancher/k3s/config.yml. A couple of the prometheus/grafana pods use aprox. 1GB ram – which pretty much swamps any of the Pi4 nodes (these are only 2GB). Setting node labels let me set node affinity so that those larger deployments end up on a Pi5 (one has 4GB and the other is 8GB).